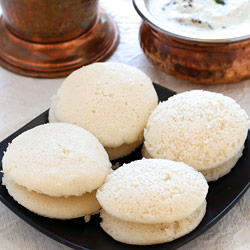

Idli Recipe (with Step by Step Photos)
Idli, a round shaped steamed rice-lentil cake, is one of the healthiest breakfast item of Indian Cuisine and staple food of South Indians. It is prepared by steaming the batter made of short-grain rice and protein rich urad dal and its preparation doesn’t require use of cooking oil apart from greasing the idli moulds in which batter is poured to give it a round disc shape. There are many varieties of idli; rice idli, rice rava idli, poha idli (aval idli), instant rava idli, ragi idli, oats idli etc., are some its examples. This step by step photo recipe of Idli explains how to make traditional rice idli from rice and urad dal batter using Idli steamer. Idli is specifically loved because of its milky white color and soft and spongy texture and both of these characteristics greatly depend on how its batter is prepared. This rice idli recipe explains how to make idli batter with right consistency and how to determine whether its fermented properly or not to make soft and spongy idli in great detail. Additionally, this recipe also covers how to make idli using pressure cooker (without idli steamer).

More South Indian Recipes
Preparation Time: 15 hours (5 hours soaking time + 8-10 hours fermentation time)
Cooking Time: 30 minutes
Serves: 4
| Ingredients: |
| 1 cup Parboiled Rice (idli-dosa rice or short-grain rice) |
| 1 cup Basmati Rice (or any rice) |
| 1/2 cup Whole Urad Dal (skinned) or split Urad Dal |
| 1/4 cup Poha (flattened rice / aval) |
| 1/2 teaspoon Fenugreek Seeds (methi) |
| Salt to taste |
| Oil, for greasing |
Directions:
 Rinse urad dal and fenugreek seeds in water for 2-3 times.
- Soak urad dal, fenugreek seeds and poha (flattened rice) together in 1-cup water for 4-5 hours. (Dal’s size and volume would increase to almost double after soaking.)
- Rinse both parboiled and basmati rice together in water for 3-4 times. (Place both types of rice in a large bowl and fill it with water till ¾th height. Rub rice grains between your fingers; this will make water turn cloudy. Drain the water and repeat the process for 3-4 times to rinse them properly.) Soak them together in 2-cups of water for around 4-5 hours.
- Drain excess water from soaked urad dal and reserve it to use in grinding process in next step. Transfer drained dal and fenugreek seeds into large jar of mixer grinder or wet grinder.
- Add 1/2 cup water (preserved in step-4) and grind until smooth texture. Gradually add more water (as needed) and grind until smooth and fluffy texture. To grind 1/2 cup urad dal, you would need approx. 1½ cup water. The amount of water required greatly depends on the quality of urad dal; so add water gradually and only as required. Ground dal mixture should have light and fluffy texture as shown in photo and it should not be very thin or very thick.
- Transfer it into a large container.
- Drain excess water from rice. Add drained rice in the same mixer-grinder or wet grinder jar.
- Add water in small quantities as needed (approx. 1/2 cup total) and grind until slightly coarse texture.
- Transfer ground rice mixture to the same container in which urad dal mixture is stored.
- Add salt and mix it well. Batter should not be very thick or very thin. Idlis will turn hard if batter is too thick, and idlis will turn flat if batter is too thin. Cover it with a plate and keep it in warm place (at room temperature in summer, and in warm place in winter) for 8-10 hours. If you are living in cold place, place the batter in oven and keep the oven light on.
- Size and volume of batter would increase as it ferments.
- Stir the fermented batter with a clean ladle or a large spoon. You should see the tiny air bubbles in the batter as shown in the photo. These tiny air bubbles are critical to make idlis soft and spongy.
- Check batter for salt and if required, add more salt and stir. Pour 1-2 glass water in the steamer and place it on the stove to heat over medium flame. Grease idli moulds with oil and pour batter over it.
- Place moulds in the steamer. Cover steamer with a lid and steam the idlis for 10 minutes over medium flame. Check whether idlis are cooked or not by inserting a knife or a toothpick in the center of idli take it out. If it comes out clean, it means idli is cooked; if it doesn’t, then idli is not cooked yet; steam it for 3-4 minutes more and check again.
- Remove idli moulds from the steamer and let them cool for few minutes. Remove idlis with a wet spoon; this will help you remove it easily from the mould.
- Transfer them to a plate or in a casserole and cover with a lid to keep them hot. Serve hot with sambar and coconut chutney in the breakfast.
Tips and Variations:
- Rinsing rice in water removes its dust and this makes idli white; don’t forget to rinse the rice 3-4 times.
- If the batter is not fermented well, add a pinch of baking soda in the batter and mix well before pouring batter into idli moulds.
- Grease moulds well with oil before pouring the batter and let them cool for few minutes for easy removal.
- How to Make Idlis Without Steamer (Using Pressure Cooker or Pan)?
- Using pressure cooker as a steamer – remove the whistle from the cooker and follow the same method as idli steamer; place the stand in a cooker, pour 1-2 glass water and heat the cooker over medium flame for 3-4 minutes and then place idli moulds in it.
- Using broad pan as a steamer – place the stand in the pan and pour 1-2 glass water in it. Heat it for 3-4 minutes and then place idli moulds in it. Cover the pan with a lid and steam for 10 minutes.
- How to use leftover idlis?
- Cut leftover idlis into small pieces.
- Make a tempering of oil, mustard seeds, cumin seeds and curry leaves in a large kadai. Add idli pieces into hot tempering mixture, toss well and cook for 3-4 minutes.
- Garnish with coriander leaves and serve hot with tea or pack it in the lunchbox.
Taste: Soft and spongy
Serving Ideas: Serve idlis with vegetable sambar and red, green or white coconut chutney or tea in the breakfast.