Header Right

Recipes In Hindi
Recipes In Gujarati
Cocktails
  • .
    • Snacks
    • Breakfasts
    • Side Dishes
    • Curries
    • Sweets-Desserts
    • Vegetarian (Step by Step)
    • Juice-Smoothie-Milkshake
    • Manchurian
    • Paneer Dishes
    • Chaat and Tikki
    • Dhokla
    • Bhindi Curries
    • Step by Step Recipes
    • Breakfast
    • Starters
    • Lunch
    • Dinner
    • Desserts
    • Roti – Paratha
    • Curries
    • Rice and Pulao
    • Daal – Kadhi
    • Snacks
    • Gujarati
    • Punjabi
    • South Indian
    • North Indian
    • Maharashtrian
    • Diwali
    • Navratri
    • Christmas
Home » Blogging Resources » 6 Essential Configurations to Change after WordPress Installation
6 Essential Configurations to Change after WordPress Installation
(2 Votes and 3 Comments)

Blogging Resources

Once you have completed the installation of WordPress and Theme, you should change few default setting via WordPress Admin Dashboard.
What is WordPress Admin Dashboard and How to Access It?
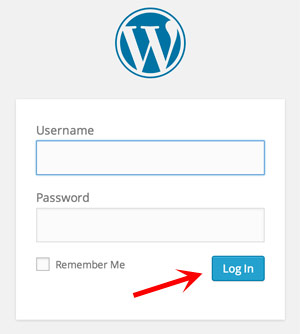
WordPress Admin Dashboard is a central command center from where you can access its different configuration options, write new posts, review comments, etc. In a nutshell it’s a central nerve system of your blog. Since it is a place from where everything about your blog can be changed, access to it is secured by username and password. Type the Admin URL that was given to you after installing the WordPress in browser to access the login screen. In general, the admin URL would look something like this
http://YourDomainName/wp-admin/ or
http://www.YourDomainName/wp-admin/
Type Username and Password and click on “Log In”
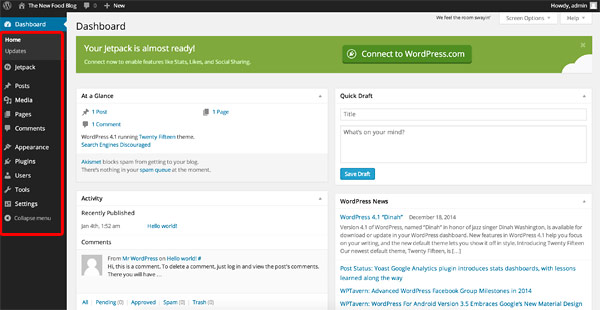
Once you are logged-in, it will take you to Dashboard that would look something like below.
Notice the links in the left sidebar. You will be accessing all configuration options from here.
1) Set Site Title and Tag Line
When you installed a WordPress, it would have given a default “My Site” and “Just another WordPress site” title and tag line respectively. You should change them to give an identity to your blog.
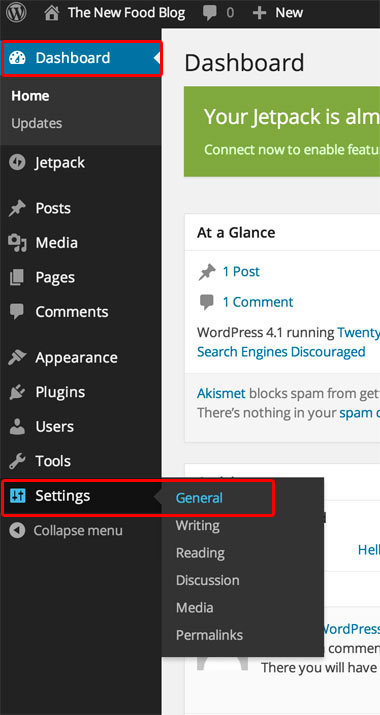
Go to Dashboard -> Settings -> General.
On right hand side window, Type the name of your blog in Site Title and short and punchy description in Tagline and save it.
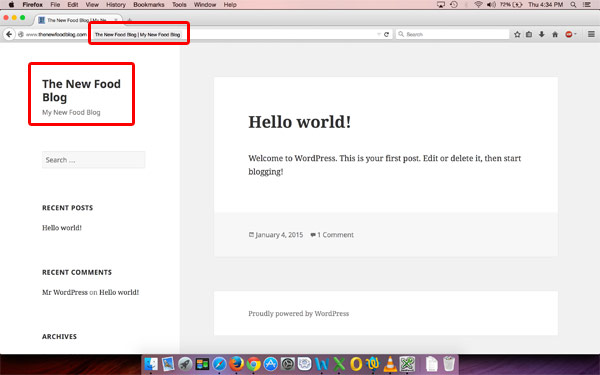
Access your blog in a new browser window; the new title and tagline would be displayed on the blog as well as on browser tab.
You can change Title and Tagline anytime you want.
2) Other Important General SettingsApart from Site Tile and Tagline settings on General Settings page (Dashboard -> Settings -> General) you should change few other settings that apply to entire site.
E-Mail Address: specify the working e-mail id to which you would like to receive all the notifications from your blog.
Timezone, Date Format and Time Format: Date and Time are displayed to visitor to indicate when particular post was published. Change Timezone to the either a city that is in the same time zone as your city or in UTC format with appropriate offset. Change Date Format to the one you prefer – we recommend selecting the neutral format that is not region specific. E.g. avoid DD/MM/YYYY and MM/DD/YYYY date formats as it may cause confusion to visitors that follow certain format. Choose non-military (12 hr) time format.
CAUTION: Do not change WordPress Address and Site Address settings unless you are specifically requested to do so. Changing these two settings will result in broken blog and website not being accessible. Keep default setting for Membership and New User Default Role.
3) Manual Comment Review and Approval
By default, WordPress auto approves comments and appear on your blog post as soon as somebody submits a comment. However, comment spam is one of worst problem on internet and if your blog is not protected against it, it could lead to degraded reader experience and affect your repeat visitor traffic. The best way to protect your blog against comment spam is to use plug-in like Akismet. However, it blocks only those comments that are auto submitted by robots and there are still reader-generated comments that would be inappropriate for your users. For example, if you are writing about food, a kitchen equipment manufacturer may try to market his products via comment in your post. The best ways to protect against such comment issues is to review and approve then individually.
Fortunately, WordPress allows this capability and here is how you can configure it.
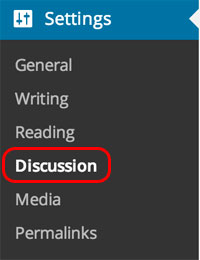
Go to Dashboard -> Settings -> Discussions.
Select check box for “Comment must be manually approved” and deselect check box for “Comment author must have a previously approved comment”. Save changes.
4) Permalinks
This one is critical. However, before we delve into what setting is recommended for this, let’s first briefly understand the basics.
What is Permalink and why is it important?
It is nothing but the permanent URL of your individual weblog post which user types in the browser to see and blog post. Every single page, post, category, tag, archive, etc., will have its own URL. A permalink is what another blog or website uses to link to your article (or section), or how you might share a link to your story in an e-mail message. The URL to each post and page should be permanent, and never change — hence its known as permalink.
There are two types of permalinks a. Ugly and b. Pretty.
Ugly Permalink:
Example: http://www.thenewfoodblog.com/?p123
“?p123” is known as query string where ? denotes the start of query string and p123 denotes a post id that WordPress would have assigned to the post. This type of permalink is not intuitive to user and doesn’t tell anything about post topic. It is also not search engine friendly as numbers doesn’t convey any meaningful information. WordPress uses this type by default.
Pretty Permalink:
Example: http://www.thenewfoodblog.com/desserts/strawberry-cake-recipe.html
This type of permalinks is user comprehensible and well structured. It also gives a SEO edge as its a search engine friendly and algorithms would be able to connect the keywords in the URL with the content of the page helping it understand the context and purpose clearly.
So, How Do You Change To Pretty Permalink?
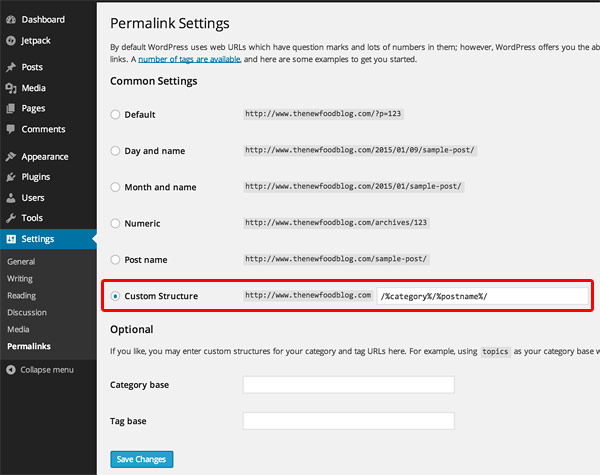
Go to Dashboard -> Settings -> Permalinks, select the “Custom Structure” and type “/%postname%/” or “/%category%/%postname%/” in associated text box.
/%postname%/ – this will add the post name in the end of URL – use this if you do not plan to use categories.
/%category%/%postname%/ – this will add category to which post belongs and post name in URL. – Use this if you plan to categorize your posts in some way.
Whatever permalink structure use choose, make sure that it is final because changing it later would also mean change in URLs of post that are already indexed by search engines and linked by other web masters and this may result in all your search engine traffic go away for some time.
5) Remove Admin user.
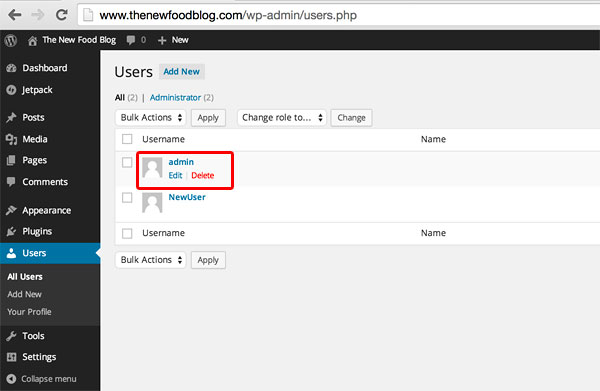
When you install WordPress, it by default creates a user named “admin” and gives it an “Administrator” privilege. This is not good for security reasons because hackers would already know the user name and only thing they now need is a password to hack-in. The solution to this problem is to create a new user with administrator privilege and delete the default “admin” user.
Note: If you are using Bluehost as your hosting service provider and installed WordPress from its control panel as discussed in this, you may not have to be worried about this as it already takes care of this and doesn’t create a default “admin” user account.
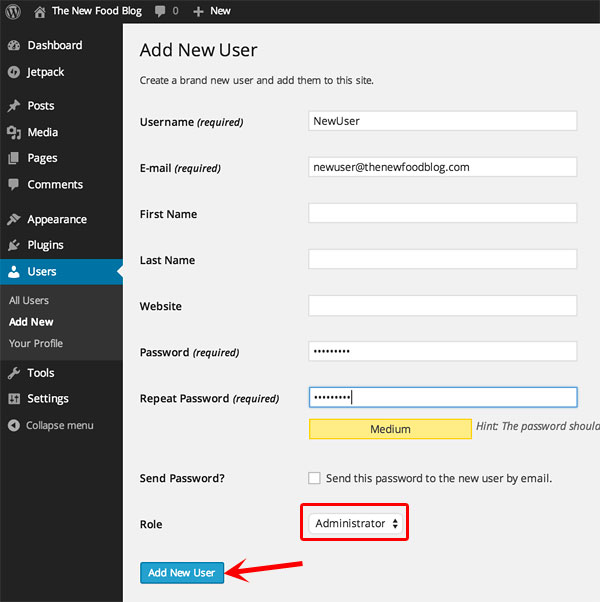
Go to Dashboard -> Users -> Add New. On Add New User page, type all required details, select “Administrator” for Role and click “Add New User”.
Now log out of dashboard, log back in with newly created user, go to Users -> All Users. Hover over “admin” user and click on “delete”.
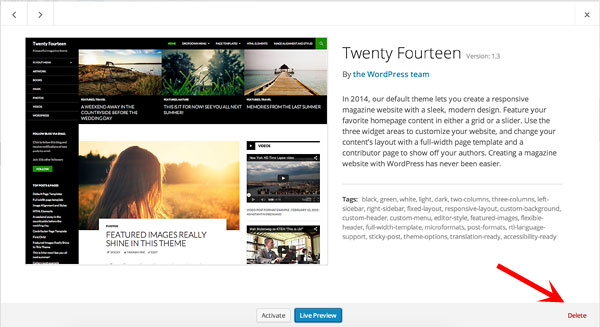
6) Delete Unused Themes and Plugins.Latest version of WordPress (at the time of this writing Version 4.1) comes with 4 different themes. Most of the bloggers end up using premium WordPress themes. Since you can install and activate new theme in less than 2 minutes, you should not keep more than 1 theme installed any time because lesser the code present on the server, lesser the chances of security gaps being exploited if there are any.
Plugins are more notorious than themes; they slow down the speed of blog, typically change or add new functionality and often have security flaws (you should always be careful about which plug-in you choose to install).
Many theme providers and hosting providers install plugins that help them sale more at the expense of speed of your blog and you should always de-activate and delete unused plug-ins.
To uninstall unused themes, go to Dashboard -> Appearance -> Themes, click on unused theme and click delete.
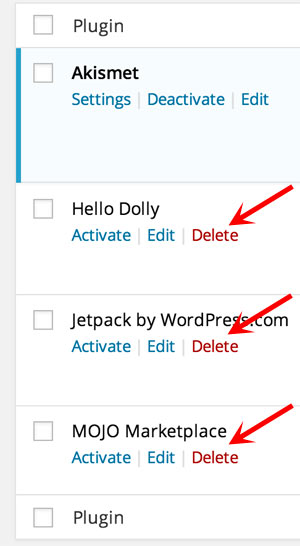
To delete unused Plug-ins, go to Dashboard -> Plugins – Installed Plugins and click on Delete present under each plugin (make sure that plugin is not active)
Delete Hello Dolly, Jetpack by WordPress.com plugins. If you are using Bluehost as your hosting provider and installed WordPress from its control panel, you will likely have MOJO Marketplace plugin installed as well and you can safely delete it too.
Disclaimer: Please note that some of the links are affiliate links in this post and I will earn a commission if you purchase through those links.

Author: Foram

Related Articles

  • How To Start Your Own Food Blog In 15 Minutes?
  • How to Choose a WordPress Theme for Food Blogs?
  • 10 Things to Consider While Choosing a Domain Name For Your Food Blog

Other Step by Step Recipes

  • Chocolate Clusters with Mixed Seeds
  • Instant Pot White Rice
  • Lobia Curry Punjabi
  • Vangi Bath (Brinjal Rice)

Post a comment ( * fields are required)


3 Comments


Sep 06, 2015 by jayakumar
Hi,
How can we expect earnings while doing this blog.. whether by clicking on ads from our blogs or by visiting our blog can expect earnings cud u plz solve my query .... Thanks

Response: You can earn from your blog by displaying advertisement. These advertisement will be displayed when someone view your food blog and if they click on the ad, you will earn the money. However, before you can start earning money from your food blog, you need to make sure that it has high quality content and has many visitors.


Sep 01, 2015 by Chanda
Hi,

First of all I want to thank you for your extremely good recipes specially dum aloo which is a super hit at my home.

I want to start a food blog. Could you please tell me is bluehost is the best site to get a domain and do word press is a user friendly interface to work with. How the charges are converted and deducted from indian credit card? Some of my friend were suggesting to go for weebly to get a domain and use their interface which is very simple.
Could you please help me out on this. I will really appreciate your response in my email.

Thank you
Chanda

Response: Hi Chanda, we are glad to hear that you liked the dum aloo recipe and you want to start a food blog. We haven't used Weebly personally and hence we can't comment on it. We have personally used BlueHost and we are satisfied with its performance and ease of use and set up. You can use Indian Credit Card to make the purchase on BlueHost.com and they will convert the USD into INR using current exchange rate.

Jun 29, 2015 by harsha
Hi, nice post friend. I want to start a food blog. I don't know html and anything. If I follow your guidelines, can I write my first post successfully after 15 minutes or should I need to learn any technical things. Please let me know.

Response: Hi Harsha, you don’t need any html or technical knowledge to start a basic blog. Follow the steps given in above post and read thoroughly, you will be able to start a blog easily within an hour. If you have any other questions regarding this, feel free to ask. I am happy to answer your queries. Best of Luck.

Primary Sidebar

Like Our Recipes? Follow Us!

Popular

  • White Sauce Pasta
  • Eggless Vanilla Sponge Cake
  • Pav Bhaji
  • Pani Puri
  • Paneer Butter Masala
  • Khaman Dhokla (Instant)

Recent Recipes

  • Almond Flour Sukhdi
  • Date Energy Balls
  • Honeydew Melon Juice

Food Gallery

Photo Gallery
Photo Gallery
Photo Gallery
Photo Gallery
View More Photos in Gallery....

Footer

Privacy PolicyCopyright InfoTerms & ConditionsAbout UsContact UsAll RecipesLatest RecipesPhoto GalleryCocktailsहिन्दी वेबसाइट

Copyright © 2025 · foodviva.com All rights reserved.